How to Record Streaming Video On Any Device (Quick & Free)
With so much live video on the web, a streaming video recorder is becoming an essential tool. Whether you’re looking to capture your own YouTube live streams, record Skype for Business meetings or something else, this guide is going to walk you through recording any streaming video.
Full disclaimer: Please keep in mind that this tutorial for recording live streaming videos is for personal use only—for example, if you wanted to record your YouTube live stream to edit later. By the way, if you are trying to do that, you may want to look at this list of the best microphones for YouTube. Under other circumstrances, we do not encourage the capturing of streaming video from sites like YouTube, Vimeo, Facebook, Twitter, and Dailymotion. Neither do we support people who are looking for ways to record streaming TV, live TV shows and copyrighted YouTube videos.
How to Record Streaming Video for Free on PC
See this video or follow the text-based guide below.
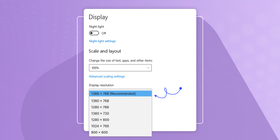
Step 1: Set your resolution up for 720p or 1080p recording
Check your computer’s capabilities and crank that resolution all the way up. How?
- On your desktop, right-click and select Display Settings
- Click the Resolution drop-down and choose one of the two HD settings (1280 x 720 for 720p HD or 1900 x 1080 for 1080p Full HD)
Pro Tip Not all monitors support HD resolution settings. If that’s your case, you will need to customize the resolution to ensure your recorded video file is in HD or Full HD. However, this may require a graphics card or additional software installations. Learn how to customize your resolution here.
Step 2: Download and install ScreenRec
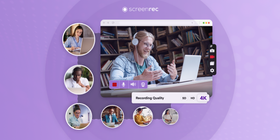
ScreenRec is one of the easiest streaming video recorders available for free. We’ll get into why later but, for now, let’s get it installed and you on your way to record online videos.
Step 3: Set your video to full screen
For the video best quality, play your video in full screen.
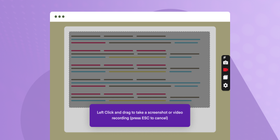
Step 4: Press Alt-S to select your capture area
This keyboard shortcut will start up ScreenRec.
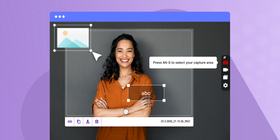
Step 5: Drag across the screen to capture the entire screen
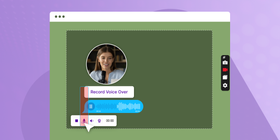
Step 6: Record the audio
Not all stream recorders can record a screen with audio. Luckily ScreenRec has an easy way to record both the sound from your microphone and the sound from your computer. Let’s see how you can do this.
- Record computer audio. Just click the audio icon in the recording panel.
- Record microphone audio. ScreenRec has already enabled microphone recording by default, so you can talk and quip as much as you’d like! To disable the microphone, click the icon in the recording panel.
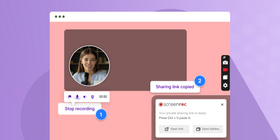
Step 7: Press Alt-S to stop recording
You’re all done! You have your very own recording of live video! Now what? Well, you have several options. You can download and save your streaming video or you can share it. Here’s how.
How to Download Streaming Video
When you’re done recording your streaming video, you’ll see the video player. Click the Download button to save the video file as an mp4. It's very similar to how you download one of your videos using a YouTube to Mp4 converter, except that ScreenRec is for downloading streaming videos."
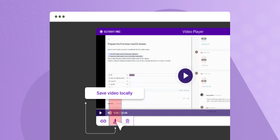
Alternatively, you can go to Recording History, preview your video and select the Download button to save it as a local file.
How to Share Your Video Capture With Others
If this is your first time using ScreenRec, click the Chain icon and create your free account.
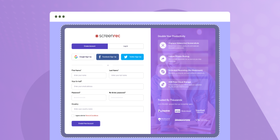
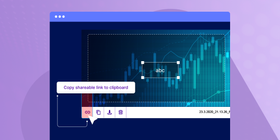
You only need to do this once. As soon as you create your account, ScreenRec will start uploading your streaming video recordings to your private cloud storage (you get 2Gb free). You will then get a private shareable URL copied directly to your clipboard.
In the future, when you’re logged in, ScreenRec will do the uploading while you’re recording which means that you’ll get the shareable link instantly.
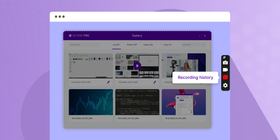
All of your past recordings are saved in Recording History.
You can always go back, preview the video and click the Chain to get that sharing link again.
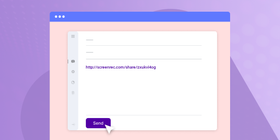
With the link, sharing your live stream recording is easy peasy. You can paste it directly into an email or a text message. No need to upload your stream recording to a file sharing service or attach it to an email.
So, why use ScreenRec?
Certainly, there are other similar tools out there but there are a few things that make ScreenRec one of the best streaming video recorders. To begin, it is a free live stream recorder that can take and annotate screenshots record video, and capture audio. What’s more, there are no recording limits. Download and share your live stream recording as you see fit. No spamware or adware of any kind to frustrate you.
How To Record Streaming Video On A Mac
There are two ways to record your screen with the built-in apps on a Mac.
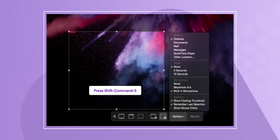
Method 1: The Built-in Screen Recorder On MacOS Mojave Or Later
Step 1: Press Shift-Command-5 to open the recording controls.
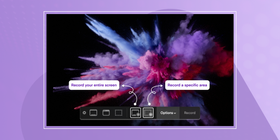
Step 2: Select recording area
- Record your entire screen. Click the Full Screen icon and choose the screen you wish to record.

- Record a specific area. Click the Region icon and drag across your screen to select your capture area.

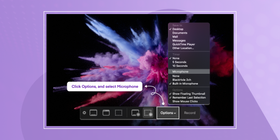
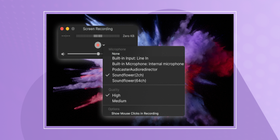
Step 3: To record audio, click Options, and select Microphone
Step 4: Click the thumbnail of your recording to edit, save, or share it
When you’re done, a thumbnail will appear in the bottom right corner. Click it to share or edit your live stream recording.
Method 2: Soundflower
If you’re a little behind on your Mac updates, that’s perfectly fine! You can record your screen using the free app SoundFlower.
Step 1: Download and install Soundflower
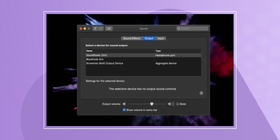
Step 2: Set up Soundflower as your output
Go to System Preferences > Sound and click on Output. Select Soundflower (2ch) as your output.
Step 3: Open QuickTime and select File > New Screen Recording
Your control window should pop up.
Click the down arrow next to the recording icon for settings including audio source recording settings. Select Soundflower (2ch) to record your computer audio.
Step 4: Start Recording
Click the Record icon and click anywhere to record your full screen. Otherwise, drag your mouse across the screen to crop your recording area. Once finished, QuickTime automatically opens your recording and from here, you can play, edit or upload it to a file-sharing site.
Now, what about stream recording on a mobile device?
Oh, yes!
Many Android and iOS devices have built-in video recorders. Getting to them takes a little bit of trickery and hunting, but we’ll guide you through it.
How to Record Your Screen on an Android Device
Android 10 comes with a built-in screen recorder but, unfortunately, it’s very difficult to get your hands on it. Let us walk you through.
Step 1: Open Settings > About Phone
Scroll down to Build Number and press it 7 times, quickly.
Step 2: Enter your PIN or passcode
You’ll see a message that says “You are now a developer!” Congratulations!
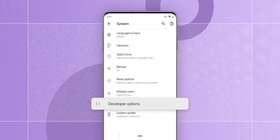
Step 3: Go To Developer Options
Now go back to the System settings, press Advanced, and press Developer Options.
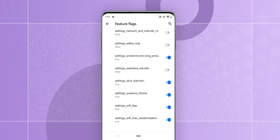
Step 4: Scroll down to Debugging and choose Feature Flags.
Scroll until you find settings_screenrecord_long_press and switch it on.
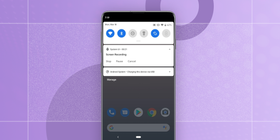
Step 5: Start recording
Long-press the power button to see the power options menu. Long-press button to Start Recording. Take note of the warning on your screen. Everything on your device’s screen will be recorded. Are you okay with that? If so, select Start Now.
Step 6: Stop the recording
In your notifications, you’ll see options for your recording (stop, pause, cancel).
Once you’ve finished recording your streaming video, the file will be saved in your gallery where you can share or delete it.
How To Screen Record On iPhone
Before we begin, it’s best for you to know that some apps will not allow the screen recorder to record audio. So keep that in mind as you begin to record your live video streams.
Step 1: Open up your settings and select Control Center.
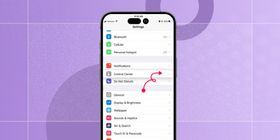
Step 2: Press Customize Controls, then tap the green plus sign next to Screen Recording.
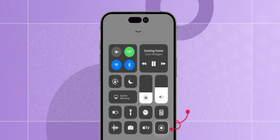
Go back to the home screen and swipe upwards from the bottom of your screen. Long press the gray recording sign that just appeared in this menu.
Step 3: Stop Recording
Touch the red timer at the top of your screen and select Stop. The finished recording is saved in your Photos gallery.
Wrapping Up
There you have it! Four different ways to record streaming video on any device. Let’s wrap it up.
Operating Systems | Summary |
ScreenRec | – Free |
Built-In Mac Recorder | – Records video and system/mic audio |
Soundflower + QuickTime | – Best for older MacOS versions |
Android Screen Recorder | – Built-in but impossible to find (or use) without enabling developer options |
iPhone Screen Recorder | – Built-in |
If you’re on a Windows PC, we encourage you to try ScreenRec. It allows you to simultaneously record video, mic and system audio. Not to mention the shareable link automatically copied to your clipboard and 2 gigs of free cloud storage. This is all at your fingertips without the need for a free trial because it’s always free!
Download ScreenRec and see for yourself.
Frequently Asked Questions
You need a desktop screen recorder like ScreenRec which can record both the computer screen and audio. Also, make sure that this screen recorder can capture HD video so that you can get the best quality. With ScreenRec, in particular, your videos will be saved to your cloud account and you can save them as mp4 files on your computer, if you want.
Yes, you can if you have a screen recorder that can capture the system audio (the sound coming from your speakers). Not all screen recorders offer this option. For example, the built-in Windows Game Recorder can only record your microphone but not the audio. One of the solutions that can record your computer screen and audio is ScreenRec. There is also recording history that allows you to go back and preview your videos.
Recording your live stream video to the cloud can be an easy task if you are already using ScreenRec. This video capturing tool automatically uploads your video while you’re recording, so you’ll not only upload your live stream recording to the cloud but you’ll also be able to do it in real time. As soon as you stop recording, you get a shareable link. Additionally, you have access to recording history, where you can preview your video and get your sharing link again.
DON’T MISS OUT
Get updates on new articles, webinars and other opportunities: